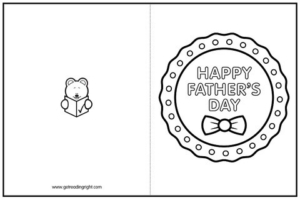
Father’s Day Card

Celebrate Father’s Day with our adorable phonics Father’s Day card, allowing your students to show off their camera word skills.

Instructions:

  • Download and print the Father’s Day Card Template
  • Photocopy back to back (one card per child) and hand out
  • Write a list of desired camera words on the whiteboard
  • Instruct the students to read each of the camera words on the whiteboard, choosing his or her favourites to write on the necktie on the inside of the card
  • Have the students colour in the card
  • Then instruct them to carefully cut around the outside of the card and fold the card in half along the centre line

Read more from our blog!

Complete the Code – DIY Giant Magnetic Letters

We have Sally Hendrick from Warragul North Public School to thank for the inspiration for our DIY Giant Magnetic Letters.

We have finally completed the collection, with a set of letters for Complete the Code! Get excited Year 2 teachers, and get those scissors ready!

You will often demonstrate to your whole class how to blend and segment with magnetic letters, and to do so you need to be working with larger graphemes. This simple four step resource is just what you need.

Instructions:

HINT! Print on coloured paper e.g. blue, to make them brighter.

  • Cut out letters individually and laminate
  • Using a strip of magnetic tape, cut around 40 small 1cm pieces

NOTE: You can buy the tape at your local Officeworks. Or even better, have you been given any useless promotional magnets lately? Save yourself some money and use those instead of the tape!

  • Superglue one or two magnet squares (sometimes more, depending on the size of the graphemes) onto the back of each grapheme

We’d advise making The Basic Code DIY Giant Magnetic Letters and The Advanced Code DIY Giant Magnetic Letters while you’re at it. You’ll need those graphemes to make whole words.

Read more from our blog!

Snakes and Ladders Board Game

Practice a range of camera words with this classic board game! We’ve updated it with a phonics twist! It works well as a one on one, or phonics rotation activity.

Set up

  • Download and print the Snakes and Ladders Board game here, or photocopy page 179. of The Synthetic Phonics Toolkit Part One.
  • Choose a selection of camera words to write in the blank spaces on the board.
  • Laminate your board game if you wish to use it as a repeated activity.

NOTE:Have the students colour in the board game as a reward.

How to play

  • Divide the class into pairs or small groups.
  • Each child must put his or her counter on the space that says ‘start’.
  • Take it in turns to roll the dice.
  • Move the counter the number of spaces shown on the dice, moving left of the ‘start’ square.
  • The child must read the camera word featured on the square out loud, to remain in that place.
  • If the counter lands at the bottom of a ladder, move up to the top of the ladder.
  • If your counter lands on the head of a snake, slide down to the bottom of the snake.
  • The child who reaches the ‘finish’ square first, wins.

NOTE:This resource can be used for both Kindergarten and Year 1. You can make the game as hard or as easy as you like, depending on the camera words you choose to include.

Read more from our blog!

Complete the Code Crossword

Practice the Complete the Code phonemes with this quick crossword! It works well as a whole class lesson or as a phonics rotation activity.

Instructions:

  • Download the Complete the Code Crossword
  • Photocopy one sheet per child and hand out
  • Discuss each of the images at the bottom of the page, so that the class is sure of each picture’s corresponding word

NOTE: If you think it is too difficult for the children to remember each image, you can write the list of images on the whiteboard, so that they have the list of words in front of them.

Answers:

Across

2. dolphin, 4. cow, 6. treasure, 8. chair, 9. witch, 11. ring, 12. jelly

Down

1. sixty, 3. paw, 4. charm, 5. earth, 7. splash, 9. wool, 10. coin


Read more from our blog!

Camera Word Shark Rotation Activity

Are your phonics rotations feeling a little dated? Never fear… We have yet another free resource for you to introduce to your students!

Set Up:

  • You will need a one minute sand timer.
  • Print Camera Word Shark Template
  • Cut out shark and laminate, cutting out around the teeth carefully
  • Use the blunt side of a knife to score the fold line on the shark
  • Cut out each individual camera word fish, laminate and place in a bowl (or pile, if a bowl is not on hand)

NOTE: Print the template on coloured paper to make it a little more exciting.

Rotation Instructions

  • Set the standing shark up on the floor with the bowl of camera word fish in front of it
  • Have the children sit around the standing shark
  • Each child will take a turn at turning the sand timer over and trying to read as many camera word fish as possible in one minute
  • Camera word fish read correctly get fed to the shark
  • Camera word fish read incorrectly must be held onto
  • Once every child has had a turn, if there is time, have the children repeat the activity reading the camera word fish that they are still holding

After all that laminating you will want to keep this resource for a while. We recommend storing any games, resources or activities in plastic storage tubs, ready to use again and again.

Read more from our blog!

Mother’s Day Resource: Mother’s Day Card

What better gift for your students to give to Mum this Mother’s Day, than a card, which shows off his or her fabulous phonics knowledge?

Instructions:

  • Download and print the Mother’s Day Card Template
  • Photocopy one card per child and hand out
  • Write the following colouring instructions on the whiteboard:

/r/ = yellow, /rr/ = blue, /wr/ = orange, /oi/ = red, /oy/= pink, /ph/ = purple, /f/ = blue, /ff/ = orange

  • Instruct the students to read each of the phonemes on the card and colour the picture, following the list on the board
  • Have the students cut around the outside of the card and fold the card in half along the centre line

If you are working on the Basic or Advanced Code, please download a blank copy of our Mother’s Day Card and fill in the phonemes on the flowers accordingly.

Read more from our blog!

Easter Resource: Easter Egg Match

Year 1 and 2 students must use their skills to match spelling representations for the /ee/ phoneme to corresponding pictures!

This activity is designed to be used in pairs. The instructions below are written for one pair. You will need to increase the amount of copies depending on how many pairs you have.

Instructions:

  • Download and print the Easter Egg Match Worksheet
  • If you would like to re-use the resource next year, laminate the worksheet before cutting anything out
  • Following the directions, cut around each Easter egg, as well as through the cracked middle
  • Place each of the pieces into a container

NOTE: An Easter basket makes a lovely substitute for a container.

  • Have the pair lay the pieces out on the floor into two piles – words and pictures
  • Taking turns, each child must recognise the picture on the eggshell e.g. “evil” (witch) and match it to the corresponding spelling representation e.g. “e”
  • This is about teamwork as much as it is phonics, so make sure that the pair are talking to one another and working to find the answer together

Read more from our blog!

Easter Resource: Phonics Rainbow Worksheet!

Keep those little brains enthralled with some spelling representation practice over Easter!

Instructions:

  • Print the Phonics Rainbow Worksheet
  • Photocopy one rainbow per child and hand out
  • Choose one group of spelling representations to work with (e.g. /ee/ea/y/e/) and have the children write one in each of the clouds provided on the left side of the rainbow
  • To the entire class, slowly dictate one word at a time from the chosen word list, encouraging them to choose the correct spelling representation and write down the word on their rainbow in the correct stripe

NOTE: You may want to give children who are having difficulty a copy of the chosen word list, making it easier for them to choose and copy the correct word.

  • Once they have filled their entire rainbow, give them a few minutes to decorate and colour in their worksheets. Display the finished work in the classroom as a festive holiday creation

To show you just how cute and easy this activity can be, we’ve included a sample for you to look at below: easter egg example

Read more from our blog!

Spelling Representation Balloons!

Do you need to spice up one of your classroom walls? Well Year 2, we’ve got just the display resource to do it!

Our Spelling Representation Balloons include all of the graphemes from each unit of Complete the Code. One phoneme per card. These balloons, provide the perfect opportunity for more passive absorption of information.

Instructions:

  • Print the Spelling Representation Balloons Template
  • Cut out and laminate the desired balloons (you may want to start with the phonemes from the unit you are currently teaching only)
  • Turn each ballon over and adhere a piece of string or curling ribbon to the bottom

NOTE: You may want to punch a hole at the bottom of each balloon and tie the curling ribbon through it instead.

  • Stick the balloons to the wall in a bundle using Blu-Tack
  • To give the illusion of real floating balloons, tie the ribbons together in a bunch below the balloon display.

Read more from our blog!

Advanced Code – DIY Giant Magnetic Letters

Some of you may remember our DIY Giant Magnetic Letters last year, inspired by Sally Hedrick from Warragul North Primary School.

Well, due to popular demand, we’ve designed DIY Giant Magnetic Letters for the Advanced Code. That’s right Year 1 teachers… it’s time to get out the laminator!

You will often demonstrate to your whole class how to blend and segment with magnetic letters, and to do so you need to be working with larger graphemes. This simple four step resource is just what you need.

Instructions:

HINT! Print on coloured paper e.g. blue, to make them brighter.

  • Cut out letters individually and laminate
  • Using a strip of magnetic tape, cut around 40 small 1cm pieces

NOTE: You can buy the tape at your local Officeworks. Or even better, have you been given any useless promotional magnets lately? Save yourself some money and use those instead of the tape!

  • Superglue one magnet square (or two depending on the size of the grapheme) onto the back of each grapheme

We’d advise making The Basic Code DIY Giant Magnetic Letters while you’re at it. You’ll need those graphemes to make whole words.

Read more from our blog!